Haproxy 는 두 말할 것 없이 현존 최고1의 오픈소스 소프트웨어 Load Balancing 솔루션이다. 그림에 나오는 구성은 응용 여하에 따라 각종 모바일/웹 서비스의 기본 모델 또는 Hadoop 등 시스템의 하부 솔루션 등에서 Active-Standby 구조의 고가용성 확보 솔루션으로 활용 가능하므로, 본 포스팅을 통해 그 실제적인 부분을 모두 다루어 구현 & 검증/확인해 보고자 한다.
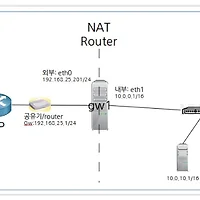
전체적인 구성은 크게 세 부분으로 나뉘는데, 본 구현에서는 앞선 포스팅들("Linux NAT router 설정하기 - Ubuntu 14.4 dom0, xen pv guest 환경", "[Xen 가상화 2] ubuntu pv guest on Ubuntu 14.4 LTS, Xen 4.4.1 - 설치 및 설정 가이드") 에서 다룬 Xen 환경을 확장하여 그대로 써먹고 있으며, nginx 웹서버에서 외부 접속이 가능하도록 설정됨(NAT Router)을 전제로 진행하므로 꼭 참고해 보도록 하자.
1. LB 서버에 Haproxy 설치(LB1: Active, LB2: Stand-by임에 유의)
2. LB 서버에 Keepalived 설치 & VRRP 구동, Failover 확인
3. 내부서버에 웹서버 nginx 설치 & Haproxy 구동 확인 & 테스트
4. (번외)내부서버에서 외부로 나가는 경로를 Keepalived 로 이중화
1. LB 서버에 Haproxy 설치
Ubuntu 에서 Haproxy 를 설치하려면 단순히 apt-get 으로 설치 가능하다. 다만 repo 에 포함된 버전은 1.4.x 버전으로 SSL을 자체 지원하지 않으며, 1.5.x 버전을 설치해야만 SSL 기능을 활용할 수 있다. 소스를 다운로드 받아서 빌드할 수도 있지만 여기서는 ppa:vbernat repo를 배포 받아 설치한다.
* 동일한 과정을 LB1(ubuntu14-pvha1), LB2(ubuntu14-pvha2) 서버에서 각각 수행한다
root@ubuntu14-pvha1:~# apt-add-repository ppa:vbernat/haproxy-1.5
root@ubuntu14-pvha1:~# apt-get update
root@ubuntu14-pvha1:~# apt-get install haproxy
root@ubuntu14-pvha1:~# haproxy -v
HA-Proxy version 1.5.13 2015/06/23
Copyright 2000-2015 Willy Tarreau <willy@haproxy.org>
* haproxy.cfg 파일을 수정한다(LB1, LB2 에서 각각 동일하게 적용)
* 192.168.25.203 은 가상ip(VIP, Virtual IP)이며, 평상시 LB1의 eth0에 binding 되어 있다가 LB1 down시 LB2 eth0가 넘겨 받도록 keepalived 를 통해 설정할 것이다(VRRP by keepalived)
* 서버별 주요 설정 값들은 붉은 글씨로 따로 표시해 둔 점에 유의(주요 설정 수치에 대해서는 haproxy 문서 별도 참조)
root@ubuntu14-pvha1:~# vi /etc/haproxy/haproxy.cfg
global
#log /dev/log local0
#log /dev/log local1 notice
log 127.0.0.1 local2
chroot /var/lib/haproxy
stats socket /run/haproxy/admin.sock mode 660 level admin
stats timeout 30s
user haproxy
group haproxy
daemon
# Default SSL material locations
ca-base /etc/ssl/certs
crt-base /etc/ssl/private
# Default ciphers to use on SSL-enabled listening sockets.
# For more information, see ciphers(1SSL). This list is from:
# https://hynek.me/articles/hardening-your-web-servers-ssl-ciphers/
ssl-default-bind-ciphers ECDH+AESGCM:DH+AESGCM:ECDH+AES256:DH+AES256:ECDH+AES128:DH+AES:ECDH+3DES:DH+3DES:RSA+AESGCM:RSA+AES:RSA+3DES:!aNULL:!MD5:!DSS
ssl-default-bind-options no-sslv3
defaults
log global
mode http
option httplog
option dontlognull
option http-server-close
option forwardfor except 127.0.0.0/8
option redispatch
retries 3
timeout http-request 20
timeout queue 86400
timeout connect 86400
timeout client 86400
timeout server 86400
timeout http-keep-alive 30
timeout check 20
maxconn 50000
frontend myLB
bind 192.168.25.203:80
default_backend myLB
backend myLB 192.168.25.203:80
mode http
stats enable
stats hide-version
stats uri /stats
stats realm Haproxy\ Statistics
stats auth haproxy:admin
balance roundrobin
option httpchk GET /hc.html
option http-server-close
option forwardfor
server pv1 10.0.10.1:80 check inter 1000 fastinter 500 downinter 5000 rise 3 fall 1
server pv2 10.0.10.2:80 check inter 1000 fastinter 500 downinter 5000 rise 3 fall 1
server pv3 10.0.10.3:80 check inter 1000 fastinter 500 downinter 5000 rise 3 fall 1
server pv4 10.0.10.4:80 check inter 1000 fastinter 500 downinter 5000 rise 3 fall 1
root@ubuntu14-pvha1:~# vi /etc/rsyslog.conf -> 아래 2개 라인을 찾아 uncomment. UDP syslog 를 port 514 로 받아들이기 위한 config 설정
$ModLoad imudp
$UDPServerRun 514
* haproxy log 가 /var/log/haproxy.log 에 쌓이는지 확인
root@ubuntu14-pvha1:~# service rsyslog restart
root@ubuntu14-pvha1:~# service haproxy restart
root@ubuntu14-pvha1:~# tail -f /var/log/haproxy.log
root@ubuntu14-pvha1:~# vi /etc/default/haproxy -> 아래 라인 추가(부팅시 자동실행)
ENABLED=1
2. LB 서버에 Keepalived 설치 & VRRP 구동, Failover 확인
* 서버 외부의 IP 주소를 NIC에 바이딩이 가능하도록 커널 옵션을 수정한다(LB1, LB2 에서 모두 수행)
root@ubuntu14-pvha1:~# vi /etc/sysctl.conf -> 아래 2개 라인을 입력해 준다
# For keepalived - vrrp
net.ipv4.ip_nonlocal_bind=1
root@ubuntu14-pvha1:~# sysctl -p (또는 리부트)
root@ubuntu14-pvha1:~# cat /proc/sys/net/ipv4/ip_nonlocal_bind
1
* keepalived 를 설치하고 config 를 설정한다(LB1에서 수행. 우선순위는 1~254 값 중 임의로 사용. 101 값에 유의)
* [중요] Master와 Slave의 Instance 명, virtual router id 를 각각 동일하게 해야 하며, Master 우선순위를 더 높게 하는 이유는, Master 가 내려 갔다가 다시 살아날 때 원래대로 다시 Master 역할을 떠맡아 VIP를 가져가게 하려는 의도
* 기본 eth0에 할당된 192.168.25.201 과 함께 VIP인 192.168.25.203 이 바인딩되도록 설정
root@ubuntu14-pvha1:~# apt-get install keepalived
root@ubuntu14-pvha1:~# vi /etc/keepalived/keepalived.conf
global_defs {
router_id ubuntu14-pvha1
}
vrrp_script haproxy {
script "killall -0 haproxy"
interval 2
weight 2
}
vrrp_instance VI_1 {
virtual_router_id 50
advert_int 1
priority 101
state MASTER
interface eth0
virtual_ipaddress {
192.168.25.203 dev eth0
}
track_script {
haproxy
}
}
* keepalived 를 설치하고 config 를 설정한다(LB2에서 수행. 우선순위 100에 유의)
* 동일한 vrrp instance(VI_1) 가 네트워크 내에 존재하면서 자신보다 우선순위가 높으면 반응하지 않게 된다
root@ubuntu14-pvha1:~# apt-get install keepalived
root@ubuntu14-pvha1:~# vi /etc/keepalived/keepalived.conf
global_defs {
router_id ubuntu14-pvha2
}
vrrp_script haproxy {
script "killall -0 haproxy"
interval 2
weight 2
}
vrrp_instance VI_1 {
virtual_router_id 50
advert_int 1
priority 100
state MASTER
interface eth0
virtual_ipaddress {
192.168.25.203 dev eth0
}
track_script {
haproxy
}
}
...
2: eth0: <BROADCAST,MULTICAST,UP,LOWER_UP> mtu 1500 qdisc pfifo_fast state UP group default qlen 1000
link/ether 00:16:3e:fa:5b:07 brd ff:ff:ff:ff:ff:ff
inet 192.168.25.201/24 brd 192.168.25.255 scope global eth0
valid_lft forever preferred_lft forever
inet 192.168.25.203/32 scope global eth0
valid_lft forever preferred_lft forever
inet6 fe80::216:3eff:fefa:5b07/64 scope link
valid_lft forever preferred_lft forever
...
...
2: eth0: <BROADCAST,MULTICAST,UP,LOWER_UP> mtu 1500 qdisc pfifo_fast state UP group default qlen 1000
link/ether 00:16:3e:d9:2c:13 brd ff:ff:ff:ff:ff:ff
inet 192.168.25.202/24 brd 192.168.25.255 scope global eth0
valid_lft forever preferred_lft forever
inet6 fe80::216:3eff:fed9:2c13/64 scope link
valid_lft forever preferred_lft forever
...
* Keepalived 의 수행 결과로 VIP가 옮겨 지면서 Haproxy 가 Failover 에 의해 잘 작동되는지 점검한다
1. Host(Dom0)에서 별도 터미널을 띄우고 VIP(192.168.25.203) 쪽으로 ping test를 실행해 둔다
2. LB1, LB2에 각각 1개의 터미널을 띄우고 LB1 서버를 셧다운(halt)한다
3. 위에서 띄운 별도 터미널의 ping test 결과를 관찰하면 약 1~2 회 가량 redirect 발생, 1~2회 가량 순단현상 발생, 이후 정상 ping 결과가 나타난다(이러한 순단현상은 ping test에 의해서 0~2회 정도까지 관찰된다)
bryan@bryan-XenPC:~$ ping 192.168.25.203
...
64 bytes from 192.168.25.203: icmp_seq=221 ttl=64 time=0.291 ms
64 bytes from 192.168.25.203: icmp_seq=222 ttl=64 time=0.297 ms
64 bytes from 192.168.25.203: icmp_seq=223 ttl=64 time=0.242 ms
64 bytes from 192.168.25.203: icmp_seq=224 ttl=64 time=0.286 ms
64 bytes from 192.168.25.203: icmp_seq=225 ttl=64 time=0.151 ms
64 bytes from 192.168.25.203: icmp_seq=226 ttl=64 time=0.270 ms
From 192.168.25.203: icmp_seq=227 Redirect Host(New nexthop: 192.168.25.203)
64 bytes from 192.168.25.203: icmp_seq=229 ttl=64 time=0.337 ms
64 bytes from 192.168.25.203: icmp_seq=21 ttl=64 time=0.288 ms
From 192.168.25.203 icmp_seq=18 Destination Host Unreachable
64 bytes from 192.168.25.203: icmp_seq=230 ttl=64 time=0.328 ms
64 bytes from 192.168.25.203: icmp_seq=231 ttl=64 time=0.316 ms
64 bytes from 192.168.25.203: icmp_seq=232 ttl=64 time=0.319 ms
64 bytes from 192.168.25.203: icmp_seq=233 ttl=64 time=0.318 ms
...
* LB2의 터미널에서 ip addr show 를 수행하면 VIP가 LB1 으로부터 옮겨와서 eth0에 바인딩 된 것을 볼 수 있을 것이다
* LB2 서버의 eth0 에 VIP가 바인딩된 것을 볼 수 있다
root@ubuntu14-pvha2:~# ip addr show
...
2: eth0: <BROADCAST,MULTICAST,UP,LOWER_UP> mtu 1500 qdisc pfifo_fast state UP group default qlen 1000
link/ether 00:16:3e:d9:2c:13 brd ff:ff:ff:ff:ff:ff
inet 192.168.25.202/24 brd 192.168.25.255 scope global eth0
valid_lft forever preferred_lft forever
inet 192.168.25.203/32 scope global eth0
valid_lft forever preferred_lft forever
inet6 fe80::216:3eff:fed9:2c13/64 scope link
valid_lft forever preferred_lft forever
...
3. 내부서버에 nginx 설치, haproxy failover 구동 확인
* 4개의 vm(ubuntu14-pv1~ubuntu14-pv4)에 각각 nginx 를 설치하고 테스트를 위한 html source 를 수정
root@ubuntu14-pv1:~# apt-get install nginx
root@ubuntu14-pv1:~# nginx -v
nginx version: nginx/1.4.6 (Ubuntu)
root@ubuntu14-pv1:~# vi /usr/share/nginx/html/index.html -> 기본 제공 html을 간단히 수정
<!DOCTYPE html>
<html>
<head>
<title>Welcome to nginx!</title>
<style>
body {
width: 35em;
margin: 0 auto;
font-family: Tahoma, Verdana, Arial, sans-serif;
}
</style>
</head>
<body>
<h1>Welcome to nginx!</h1>
<p>If you see this page, the nginx web server is successfully installed and
working. Further configuration is required.</p>
<p>For online documentation and support please refer to
<a href="http://nginx.org/">nginx.org</a>.<br/>
Commercial support is available at
<a href="http://nginx.com/">nginx.com</a>.</p>
<p><em>Thank you for using nginx.</em></p>
<p>Hostname: ubuntu14-pv1</p>
</body>
</html>
* LB로부터의 Health-check request 을 받기 위한 별도의 html 파일 준비
root@ubuntu14-pv1:/etc/nginx# vi /usr/share/nginx/html/hc.html
<!DOCTYPE html>
<html>
<head><title>Health Check file</title></head>
<body>
OK?
</body>
</html>
* (특별 부록1) 외부로 ping 은 나가지만 인터넷 주소로 외부 접근이 안되는 경우 DNS 설정을 해 주어야 한다. Ubuntu 12 부터는 /etc/resolve.conf 만 수정할 경우 리부트 후에 Network manager 에 의해 초기화되므로 다음과 같이 DNS server 를 변경해 주어야 한다.
<고정 ip를 사용할 경우: /etc/network/interfaces, NIC별 직접 설정만으로 충분>
iface eth0 inet static
address 10.0.10.1
...
dns-nameservers 8.8.8.8
<고정 ip 여부에 무관하게 항상 우선적으로 적용되게 할 경우>
root@ubuntu14-pv1:~# vi /etc/resolvconf/resolv.conf.d/head
nameserver 210.220.163.82
nameserver 219.250.36.130
nameserver 8.8.8.8
* (특별 부록2) nginx 는 haproxy 와 같은 Load balancer 로부터의 접속에 대해 Client(web browser)의 실제 IP를 손쉽게 로깅할 수 있는 방법을 제공한다(cf: Apache의 경우 mod_rpaf 등의 별도 모듈 설치/설정 필요. 로그파일이나 Web 프로그래밍시에 사용하는 서버변수의 경우에도 Apache는 HTTP_X_FORWARDED_FOR 와 같은 별도의 변수를 써야 하지만, nginx는 LB가 없을 때의 기존 방식 그대로 REMOTE_ADDR 변수를 사용할 수 있다). 이 때 haproxy 측에서는
option http-server-close
option forwardfor
와 같이 config 를 미리 설정하여 X-Forwarded-For 헤더를 웹서버로 전달하도록 하고 nginx 측에는 아래와 같이 설정하면 간단히 구현된다. 여기서 10.0.0.1, 10.0.0.2 는 LB1, LB2(즉 Haproxy 서버) 측의 내부 네트워크 쪽 NIC의 IP 주소들이다.
root@ubuntu14-pv1:~# vi /etc/nginx/nginx.conf -> 붉은 글씨의 라인들 추가
http {
...
# server_name_in_redirect off;
##
# Real IP settings
##
set_real_ip_from 10.0.0.1;
set_real_ip_from 10.0.0.2;
real_ip_header X-Forwarded-For;
root@ubuntu14-pv1:~# service nginx restart
* (특별 부록3) 위의 config 하단을 잘 보면, LB로부터의 지속적인 health-check request 들이 다량으로 로그에 쌓이게 된다. 따라서 config 파일 내의 http 블록 안에 server-location 블록을 설정하여, 80 포트로 들어온 /hc.html 페이지 호출 request 는 access_log 에 쌓지 않도록 설정하였음을 알 수 있다(옵션 사항)
* Haproxy 를 통해 들어온 접속의 Client 측 Real IP 를 확인해 보기 위해 log 에 tail 을 걸어서 확인한다. 웹브라우저는 외부 네트워크인 192.168.25.2에서 Chrome 브라우저를 띄우고 http://192.168.25.203 으로 접속을 시도한다.
root@ubuntu14-pv1:~# tail -f /var/log/nginx/access.log
...
192.168.25.2 - - [01/Jul/2015:11:43:03 +0900] "GET / HTTP/1.1" 200 414 "-" "Mozilla/5.0 (X11; Linux x86_64) AppleWebKit/537.36 (KHTML, like Gecko) Chrome/43.0.2357.130 Safari/537.36"
...

* 이후의 테스트 및 검증은 위의 2에서 수행한 것과 유사한 방식으로 LB1, LB2 를 번갈아서 shutdown 하면서 nginx access.log, 테스트용 브라우저의 결과 화면을 모니터링해 보면 되겠다
* 참고로, 일반적으로 많이 사용하는 Apache Bench 를 사용하는 예를 아래에 기재해 두었다
root@bryan-XenPC:~# apt-get install apache2-utils
root@bryan-XenPC:~# ab -n 50 -c 10 http://192.168.25.203/index.html
This is ApacheBench, Version 2.3 <$Revision: 1528965 $>
Copyright 1996 Adam Twiss, Zeus Technology Ltd, http://www.zeustech.net/
Licensed to The Apache Software Foundation, http://www.apache.org/
Benchmarking 192.168.25.203 (be patient).....done
Server Software: nginx/1.4.6
Server Hostname: 192.168.25.203
Server Port: 80
Document Path: /index.html
Document Length: 642 bytes
Concurrency Level: 10
Time taken for tests: 0.013 seconds
Complete requests: 50
Failed requests: 12
(Connect: 0, Receive: 0, Length: 12, Exceptions: 0)
Total transferred: 44102 bytes
HTML transferred: 32052 bytes
Requests per second: 3861.60 [#/sec] (mean)
Time per request: 2.590 [ms] (mean)
Time per request: 0.259 [ms] (mean, across all concurrent requests)
Transfer rate: 3326.26 [Kbytes/sec] received
Connection Times (ms)
min mean[+/-sd] median max
Connect: 0 0 0.1 0 1
Processing: 1 2 0.5 2 3
Waiting: 1 2 0.5 2 3
Total: 1 2 0.5 2 4
Percentage of the requests served within a certain time (ms)
50% 2
66% 2
75% 3
80% 3
90% 3
95% 3
98% 4
99% 4
100% 4 (longest request)
4. 내부서버에서 외부로 나가는 경로를 Keepalived 로 이중화하여 Failover
* 웹서비스를 위한 VIP(192.168.25.203) failover에 더하여, 내부서버에서 패키지업데이트 등 유지보수 활동을 위한 외부 접속을 위해 내부서버의 gateway용 VIP(10.0.0.3) 을 keepalived 에 등록한다
* LB1, LB2의 keepalived config를 아래와 같이 수정한다하고 서비스 재시작
root@ubuntu14-pvha1:~# vi /etc/keepalived/keepalived.conf <== 아래 내용을 추가
...
vrrp_instance VI_2 {
virtual_router_id 100
advert_int 1
priority 101
state MASTER
interface eth1
virtual_ipaddress {
10.0.0.3 dev eth1
}
track_script {
haproxy
}
}
root@ubuntu14-pvha1:~# service keepalived restart
root@ubuntu14-pvha2:~# vi /etc/keepalived/keepalived.conf <== 아래 내용을 추가
...
vrrp_instance VI_2 {
virtual_router_id 100
advert_int 1
priority 100
state MASTER
interface eth1
virtual_ipaddress {
10.0.0.3 dev eth1
}
track_script {
haproxy
}
}
root@ubuntu14-pvha1:~# service keepalived restart
* 4개의 vm(ubuntu14-pv1~ubuntu14-pv4), interfaces config의 gateway 인 10.0.0.1을 VIP인 10.0.0.3으로 수정하고 네트워크 재시작 또는 리부팅(확인 과정은 위의 keepalived 확인 과정과 유사)
root@ubuntu14-pv1:~# vi /etc/network/interfaces
...
auto lo
iface lo inet loopback
# The primary network interface
auto eth0
#iface eth0 inet dhcp
iface eth0 inet static
address 10.0.10.1
netmask 255.255.0.0
network 10.0.0.0
broadcast 10.0.255.255
gateway 10.0.0.3
dns-nameservers 8.8.8.8
[관련글]
2015/06/28 - [Xen 가상화 2] ubuntu pv guest on Ubuntu 14.4 LTS, Xen 4.4.1 - 설치 및 설정 가이드
2015/06/30 - Linux NAT router 설정하기 - Ubuntu 14.4 dom0, xen pv guest 환경
2015/07/01 - Haproxy, Keepalived, nginx 를 이용한 고가용성(High Availablity) 웹서비스 환경 구현
<포스팅 관련하여 문제점이나 이해가 안되는 점, 궁금한 사항이 있으시면 댓글로 소통 부탁 드립니다.>
<주요 참고 사이트들>
http://www.tecmint.com/install-haproxy-load-balancer-in-linux/
http://blog.laimbock.com/2014/10/01/howto-setup-high-available-haproxy-with-keepalived/
http://behindtheracks.com/2014/04/redundant-load-balancers-haproxy-and-keepalived/
- Barracuda -
- 이의 제기가 있어서 Comment 만 달아 둡니다. 잘 알려지고 활용성 높은...정도의 의미입니다. 벤치마킹을 해 보지 않아서 소프트웨어 LB중에 성능, 기능상 최고라고는 얘기 못한다는 말. [본문으로]
'Technical > Network' 카테고리의 다른 글
| VirtualBox 에 Vyatta 라우터로 VM 가상 네트워크 구성하기 (0) | 2017.05.04 |
|---|---|
| 티스토리, 2차 개인도메인 사용자에게 CNAME 변경 요구 해프닝 (0) | 2016.10.09 |
| Linux NAT router 설정하기 - Ubuntu 14.4 dom0, xen pv guest 환경 (2) | 2015.06.30 |
| [보안 상식] 윈도우 원격 데스크톱 접속(연결) 흔적 없애기 (4) | 2014.03.01 |
| pdns 3.2 authoritative on OpenSUSE 12.1 설치/설정(pdns_gui, mysql backend) (0) | 2013.02.12 |